If you are looking for a laundry list of ways to audit your Google Analytics account, this is not for you.
This article is not a long analytics audit checklist filled with vague terms and instructions that don’t bother to teach you anything about the why of data collection. This article aims to answer the question, “So, what?” when it comes to auditing your Google Analytics account.
Before you yell back at me about the need for accurate data let me stop you. Of course, accurate data is a worthy goal. But what’s data, even good data, without interpretation?
Marketers and business owners have a habit of looking at Google Analytics like it’s a calculator when in reality, Google Analytics is a compass. Auditing your account makes sure your needle is always pointing North.

I’m taking it as a given that you are somewhat familiar with Google Analytics already. Maybe you have suspicions about your website data, certain numbers aren’t lining up. Or, you have the correct data and now you’re wondering if there are better ways to organize and interpret this data.
If this sounds like you then you’re in luck because this Google Analytics audit is for you. I will show you how just a few of these changes can clean your data and unlock insights you can use to make your website more profitable. Some of these examples apply more to one type of site than another. For example, enabling eCommerce tracking doesn’t make much sense for a B2B manufacturing company.
So, without further ado, Let’s get started.

Install/Set-Up Tracking Code
Let’s talk for a second about your Google Analytics setup. I won’t spend too much time on this because I’m guessing you already have installed the Google Analytics snippet on your site.
I advocate always using the Google Tag Manager (GTM) snippet to implement your GA setup. You can find a walkthrough of installing GTM here. You cannot beat its flexibility and you get to avoid coding as much as possible. Not to mention all your other tracking, or cookies, or tags, can integrate into this neat little code. (Find a few more tricks it can do by reading this post on Search Engine Land.)
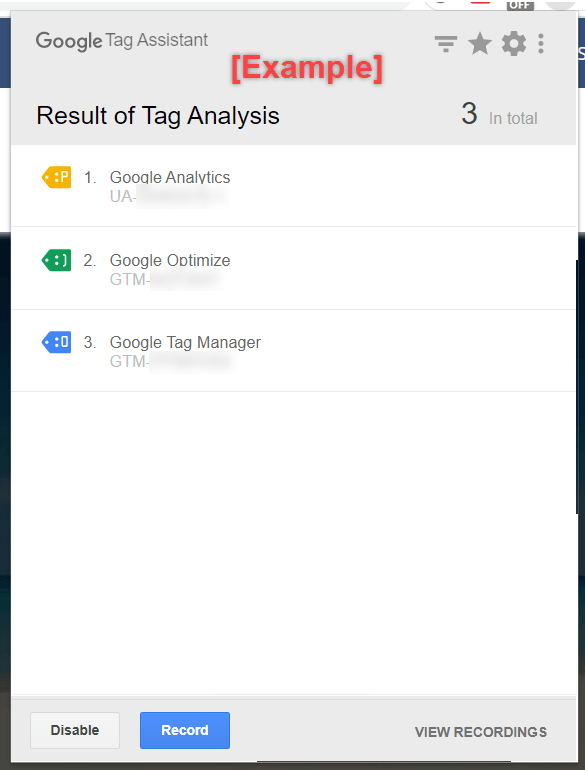
If you want to quickly check if a page has a Google Analytics code on it, use the Google Tag Assistant Chrome browser extension. Add it to your browser, hit enable, and reload the page. You should have a Google Analytics tag in there that is either blue or green (not yellow or red).
Takeaway: Google Tag Manager will reduce the need for hardcoding and therefore reduce your need to keep a developer on standby. It will not completely eliminate the need for coding, but it will help a lot.
Enabling Site Search Tracking
If you have a big site, you should be sure to have a search box. For content or product marketers, site search can indicate which articles or other important information people are not able to find through your navigation. In GA, check on these terms in Behavior > Site Search > Search Terms. Are people searching for an article you haven’t written about? Create content for these searches.

For e-commerce, go to Behavior > Site Search > Overview and you’ll see that visitors who perform a site search have a higher conversion rate than people who don’t search.
Setting up Site Search is as easy as going into your Admin panel, click on View, View Settings, and turning on the Site Search button. Be sure to identify the query parameter so GA knows what it is looking for. It’s usually an “s” or “j” or “keyword” (no quotes). Use the search bar on your site and see what your query looks like.
Takeaway: Find out what visitors want to see on your site, then make it easier for them to find it through better placement, better internal linking, or creating what they are searching for.
Demographics and Interest Reports
Demographics can be very interesting when you start comparing them to your target market. Your persona may be a 40-year-old, male financial advisor. Yet, your website visitors are 75% female and between 25 and 35 years old. Use this data to calibrate and inform your content and ad strategy.
Interests can be used similarly. Take this data and try out Google in-market targeting using the interest information provided in Audience > Interests reports. Additionally, glance to be sure most of these interests are relevant to your business. If a lot of home gardening enthusiasts are showing up on your site, you may have to rethink some things (unless of course, you garden).
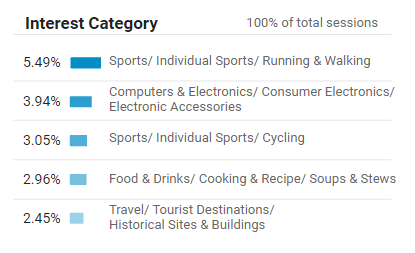
Setting up demographics and interests is as simple as turning on a button. Go to Admin > Properties > Property Settings, and switch it on.
Takeaway: Does the age, gender, and interests of your website visitors (broadly) match your persona? How can you change your site to appeal to your intended demographic?
Multiple Views
Why do people never take the time to do this? One errant filter can stink up your data for months to come. Month over month, year over year, bad data will put an asterisk (*) next to every possible insight*.
Make it easy. One view is Raw, just raw data unfiltered. The second is your Test view where you can apply filters and test their effectiveness against the raw view. By comparing your Raw and Test view numbers, you can make sure your filters aren’t too aggressive or weak. Tweak your filters here, then apply them to your Master view. You will only report data from the Master view.
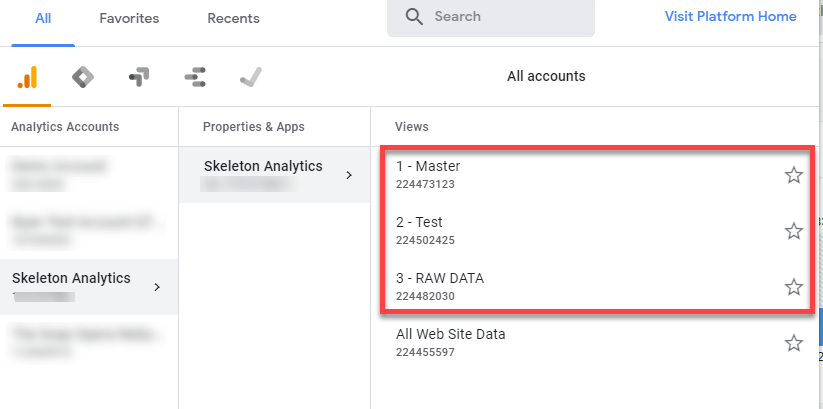
Another interesting use case is creating views for multiple agencies. For example, if you hire person A to improve your organic traffic, and person B to improve your paid traffic, you can create additional Master views that filter out CPC or organic source traffic from those views. Then you can give an agency access to just the view that they need.
To set up go to your Admin and click on Create View in the View section.
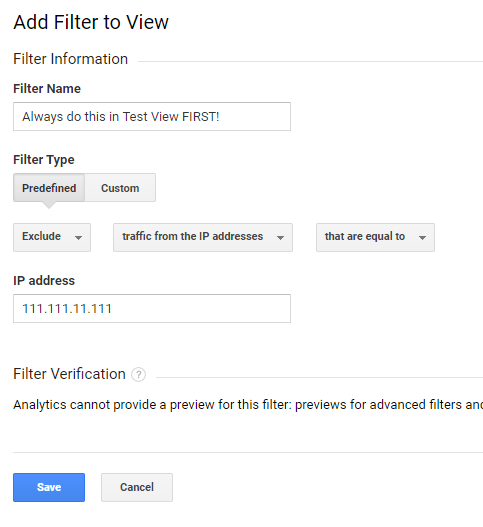
Takeaway: Use views to test filters before applying to your reporting data. Filters are destructive and there’s no way to get the information back.
Filters
Lean back in your chair, pull your shoulders back a little, and get a few cracks out of your system before we dive into a little talk on filters. Filters are probably in the top 4 for most important features of Google Analytics (Custom Dimension for User Id would be one other, event tracking, and probably campaign tagging after that).
Filters are what you use to clean your raw data. But they are also destructive. So you have to be careful with them. But if they are set up correctly, your data will be easier to read, comprehend, and take action on.
Every website is unique, so without going into the weeds, let’s answer the question, what should you filter first?
- The first step is to exclude bot traffic. Bots are little robots that go around scanning the internet. You can turn them off by checking the box under View Settings called, “Exclude all hits from known bots or spiders”.
- Next would be to filter out any internal traffic. If it’s just a few people, exclude them by their IP address. Filter > Custom > Exclude > IP Address > Exactly Matches > Enter IP address.
- If your team uses a project and communication management tool like ClickUp or Basecamp, you may see Basecamp as a referrer in your Acquisition > All Traffic > Referrals report. Filter > Custom > Exclude > Host Name (basecamp).
- Speaking of the hostname. In rare instances, your analytics ID could be hijacked by others (spammers). Set up a filter to include all traffic only to your hostname/domain page. Filter > Custom > Include > HostName (your site). This should automatically include any subdomains, however, this is dependent on your set up.
- To avoid duplicate pages, add a custom filter that makes all page URLs, site search, and campaigns lowercase (you’ll need 3 separate ones). If you don’t do this, site searches for “Contact page” and “contact page” will appear separate. Use Filter > Custom > Lowercase > Search Term, Request URL, Campaign Name (respectively).
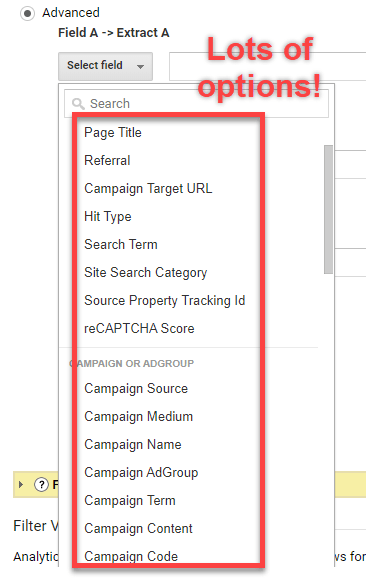
And these are only a few of the filters you can set up. LovesData has a great article dedicated to filtering. I didn’t touch on cleaning up URL query parameters because that is very website centric and I don’t want to give you bad advice that could ruin your data.
Pro tip: Creating a segment is more flexible than a filter. Use segments, not filters if you want to (for example) only look at traffic inside your service area. Segments are non-destructive and very flexible.
Takeaway: You should absolutely use filters, but be careful, always test in the Test view. Filters will clean your data allowing you to see insights quicker and allowing you to make faster business decisions.
Link Accounts (Ads and Search Console)
Let’s take a breather before the next section. Briefly, linking your Google Analytics account to other accounts you have will allow you to see more data in a larger context. At the very least, connect your Google Search Console and Google Adwords. Google Search Console will be invaluable for anyone doing SEO. Google Ads will bring in campaign data so that you can view your PPC campaigns next to your organic campaigns for easy ROI comparison.
Set this up by going into your Admin. Under Property, click on All Products. Then add any products that apply. Pay attention and make sure the time zones match.
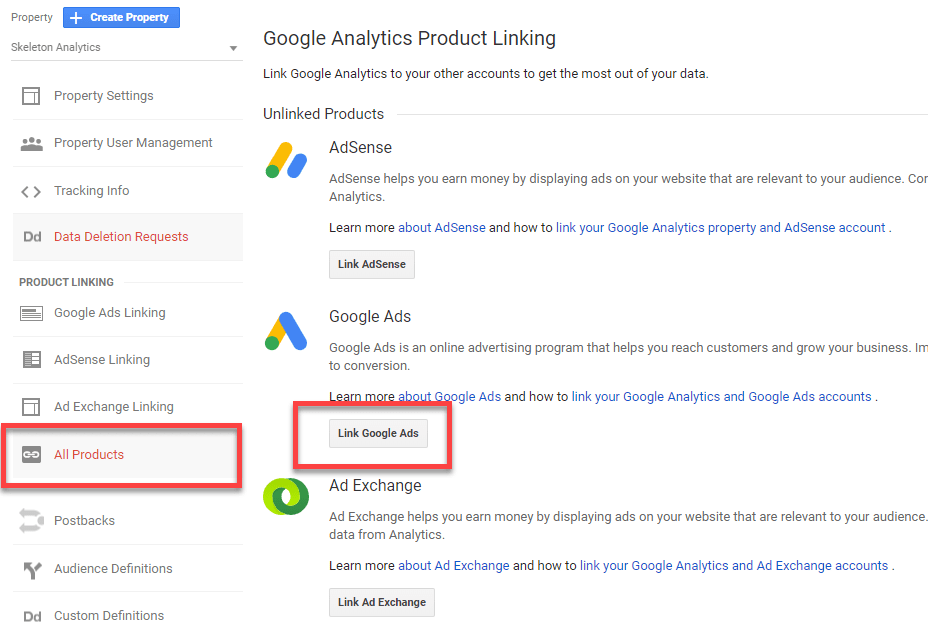
Pro tip: Even if you don’t currently use Google Ads, set up an account, put in your billing information, and run an ad for 30 seconds. No one will click on your ad (probably) so you won’t be charged. Once you’ve entered billing information, you can use the Google Ads as a research tool.
Takeaway: If you are more on the organic/SEO side of things, you can see your search results rankings, impressions, and clicks all inside Google Analytics. Are your organic rankings improving?
Find out Under Acquisition > Search Console > Queries. For paid, how many goals is your paid strategy completing versus your organic traffic? What is the ROI between these two? Find out by connecting and reviewing the data.
Event Tracking
I can only briefly mention event tracking because its uses are so varied and powerful. The biggest trip-ups in event tracking usually happen either at the outset or when the site updates. Standard Google Analytics is great at pageviews. But for events, which are any interactions on the page, you need to set up events.

Set up event tracking using Google Tag Manager. Explaining how to set up events in Google Tag Manager is beyond this article, but needless to say, you should do it. You likely won’t need a developer to help you.
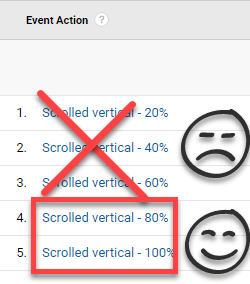
Protip: If you use SEO, you might see lots of traffic and high bounce rates from readers who read your article and leave. Consider creating an event that could be a proxy for an engaged reader. Some analysts use scroll tracking and fire an interaction event at 25% scroll depth to reduce their bounce rate. Honestly, I think this is in bad taste.
My tip would be to combine a scroll depth with time on page trigger. If someone stayed on the page for a minute and scrolled 90% of the way down, I’d feel comfortable saying they engaged with the content. Create an event and fire it to reduce your bounce rate.
Takeaway: Decide what actions on your website are important to you. Yes, purchases, and filled out forms. But what else? Maybe someone who viewed 90% of your explainer video, maybe someone who visited three pages on your site? Maybe someone who signed up for your newsletter. Whatever is important, track.
Goals
Goals are how you measure your website. The biggest mistake I see companies make is that they don’t put values on their goals. Now, if you’re an e-commerce company, then purchase data is dynamically entered. In that case, I agree that goals shouldn’t have values. But if you have forms, newsletters, and other content designed to appeal to prospects (aka find leads), then you need to put a dollar sign on that goal.
Without goal values, all goals are equal. In digital marketing and business, that simply can’t be the case. An El Camino and a Bugatti aren’t equal because they have four tires and an engine. I recommend using average customer lifetime value and then dividing it by the usual steps needed to close.
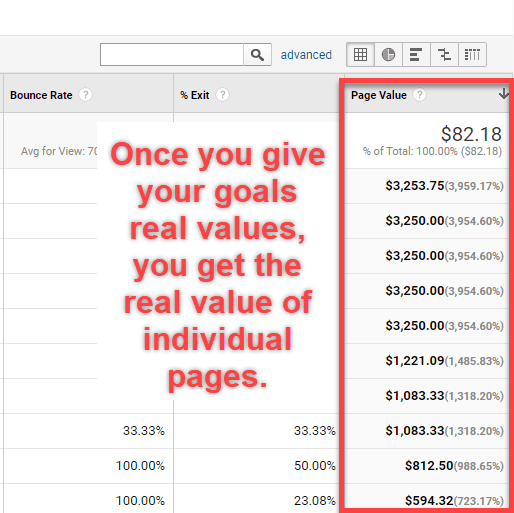
Let’s say 100 visitors fill out a contact form. Only 30 are qualified for your product. Of those 30, you get meetings with ten. Of those ten, you close one and they become a customer. If your LTV is $20,000, someone filling out that form is worth $200 (20,000 divided by 100).
The question then becomes, what can you do to improve the conversion rate of your contact form? Since you have consistent, and real values, you can A/B test and optimize.
I’ll mention that this valuation is pretty fluid. I tend to start with conservative estimates. Then I alter them based on what I’m hearing on the backend. If the leads convert better or worse then I adjust.
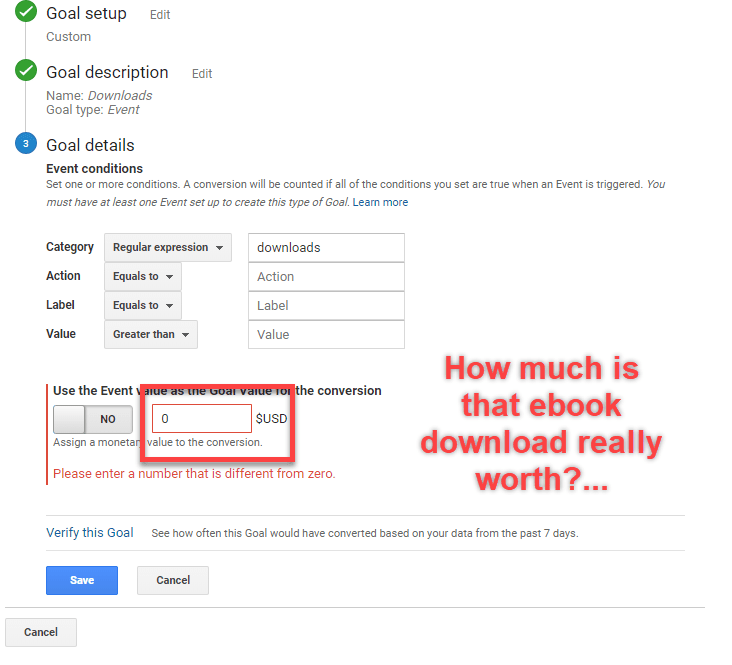
Setting up goals is pretty straight forward. In your Admin, go to View and Goals. Tracking page views (like a thank-you page) is far easier than an interaction event. For events, I would create the event in Google Tag Manager and when they come in, tag them as goals in Google Analytics.
Takeaway: List down micro and macro goals. Assign value where you can directly measure it. The more accurate your goal values, the more accurately you can adjust your website to improve goal completion aka revenue.
Content Grouping
Content grouping is a nice function that lets you easily view and compare different types of pages on your site. Which pages are getting more visits, blog posts, or products? Which has more engagement? Which page groupings are accomplishing more goals? Where are you crushing? Where are you weak?
Content groupings are not retroactive, so I suggest setting this up early. If your sitemap is set up in the usual way, all of your products will always show up under the “/products/” folder. The same for your blogs (“/blog/”), or resource pages (“/resources/”). This means you can add new pages and they will automatically be grouped.
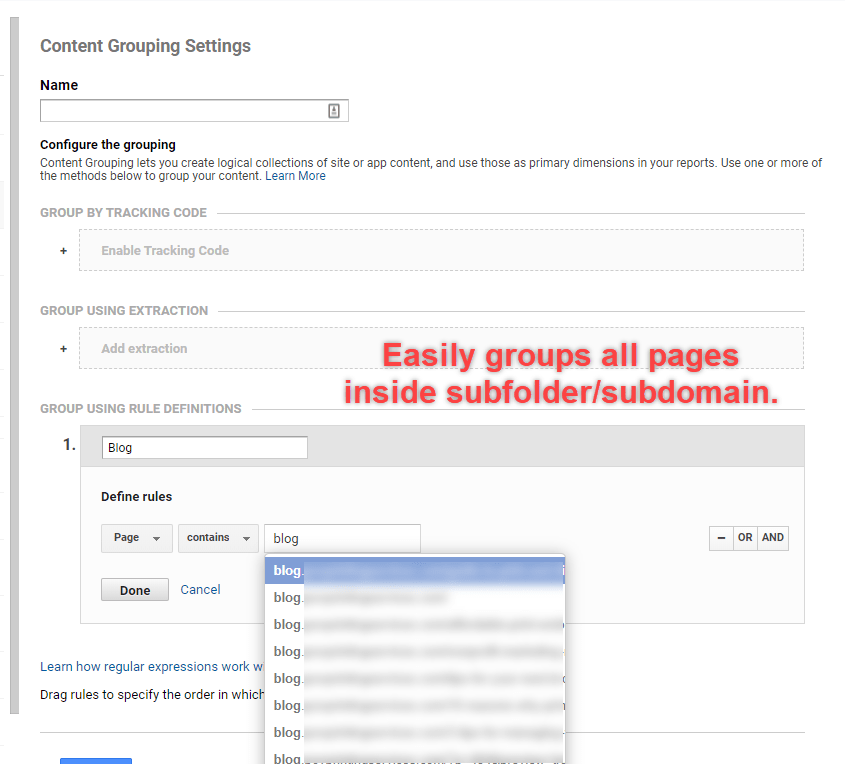
To set this up, go to Admin, View, Content Groupings, Create New Content Groupings. I like to use the third option, Group Using Rule Definitions, because of its flexibility. You can see Content Groupings in the Behavior > Site Content > All Pages report. Just above the columns, it says Content Groupings in small letters.
Takeaway: How do you want to group your site’s content? You can go with what I’ve described above. Or, I’ve seen people group by BOF, MOF, TOF content (bottom, middle, top of funnel respectively). Or, maybe your site has a few core offerings, you could group by Offering A, Offering B, Offering C.
Custom Dimensions and Metrics
Custom dimensions seem like a “nice to have”, but by using just a few custom dimensions you can gain some great insights. For example, if your site requires a login for complete access, you may want to test a “login using your Google account” button to see if it increases logins. How do you do this? Custom Dimensions.
What if you want to calculate how many times this button was shown versus how many times it was clicked? Custom metrics. Timestamp, Client Ids, and much more you can achieve with custom dimensions and metrics. This granularity is why they are so popular. Both can be found under the Admin > Properties > Custom Definitions.
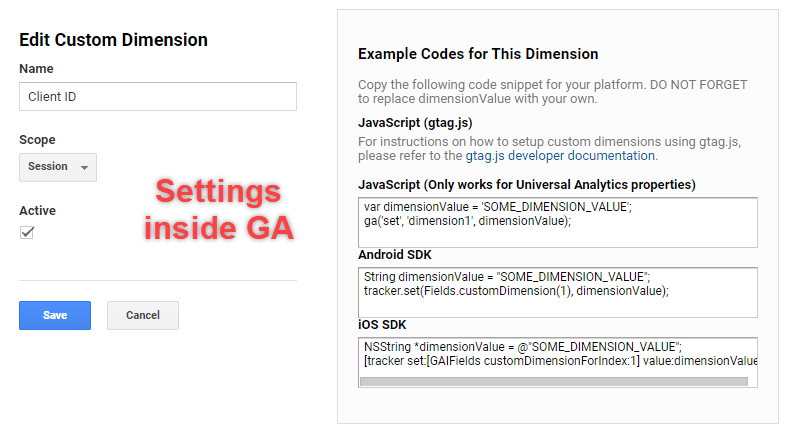
For more ideas on how you can use custom dimensions, check out this post on Simo Ahava’s blog.
If you are taking over an account, check out the custom definitions and see what’s in there. To see them in action, you can go to Behavior > Site Content > Landing Pages. Then click on the secondary dimension and choose the custom dimension you saw in the custom definitions folder.
For custom metrics, go to your Google Analytics Reports, Customization (way at the top) > Custom Reports, and see what’s in there. Remember that this report takes time to populate and does not work retroactively.

Setting this up is… well, it’s difficult. Frankly, I don’t recommend it until you have most of the other recommendations locked down. You’ll need the confidence of building several well working filters and setting up a few events before tackling this part.
Takeaway: You’ll know when you’re ready (lol – but no, seriously).
PII (Personally Identifiable Information)
Collecting PII is against Google’s terms of service and so you must be careful to remove all PII in your GA account. Emails can sneak in, so can IP addresses. You don’t want to wake up one day to some emergency. I recommend two actions. Use Google Tag Manager to anonymize the IP addresses. This works by redacting the end of the IP address of the website visitor. I use Google Tag Manager – see how easy this is! – to take care of this potential problem. Some Google Analytics plugins, like Monster Insights, have a simple box to check to anonymize IP addresses.
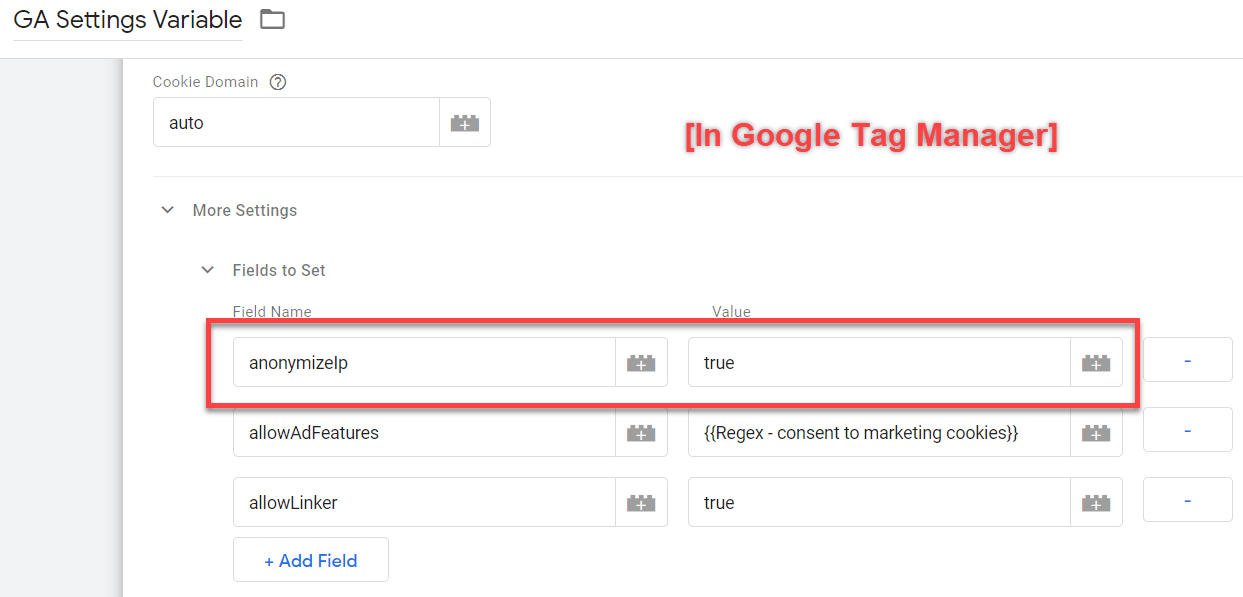
You might be worried about a reduction in accuracy because of this process, but multiple studies have shown that the reduction is fairly insignificant.
Another issue is that you might have is email addresses that are tacked on to the end of your page URLs in the form of queries. To get rid of this you should, you guessed it, use Google Tag Manager and redact emails. Brian Clifton has refined a piece of Javascript code by Simo Ahava that you can insert via Google tag Manager using a feature called customTask.
Takeaway: Don’t let PII sneak up on you and disrupt your business! Use Google Tag Manager as it will make all this much easier.
GDPR
Yes, you need to think about it. No, this is not legal advice. However, here is a link to a short checklist direct from GDPR for US companies.
GDPR is already active in the EU and it’s already catching on in other countries such as Brazil as well as California, USA. Simply put, you have to let people know you’re tracking them or you could be held liable. You don’t need that headache.
There are plugins and services that you can find that will halt tags/codes/tracking until someone agrees to be tracked via a pop up on your homepage.

You can use Cookiebot and set up exceptions to all of your tags in Google Tag Manager. There are also plugins that you can download and enable. The list goes on. Find whatever is easiest for your site.
But. The big thing is to check it and make sure it works.
If you have a small amount of traffic, or you are on a page that is not visited very much, open Google Analytics real-time reports.
Clear your cookies and go to your website (if your site is small, your home page will work). The pop up should pop up, don’t click it.
Check your real-time reports, is it saying that there is someone on the page you are on? If so, and it’s not someone else, then the GDPR blocker is not working.
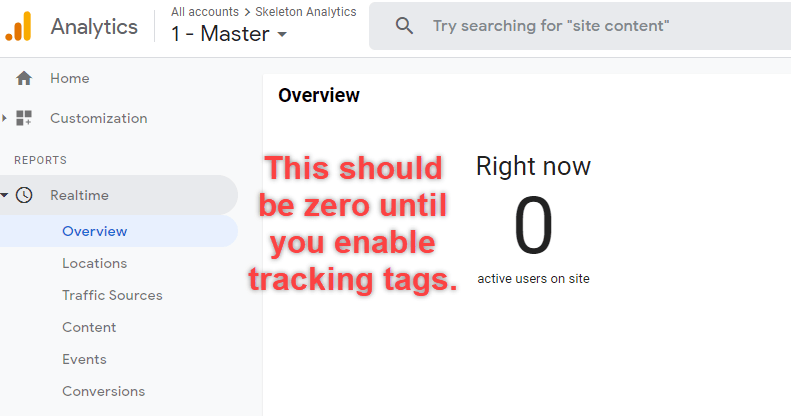
If Google Analytics is not seeing you, agree to the pop-up, and make sure your visit starts recording in Google Analytics. If everything works, you’re golden.
Takeaway: These last two have been more about CYA than analytics. But let’s be real, for all the information you can gain and act on, there should be limits to what you can collect. If you are wondering how you can find out if your Google Analytics has PII in it, check out this article.
Self-Referrals and Cross-Domain Tracking
If your business owns several websites, you will want to be able to track visitors from one domain to another. By default, your GA account tracking code only works on one domain (your default URL). That means that if you link between two sites, any visitor who goes from one domain to the other is counted twice.
Under Google Analytics Property, select Tracking Info, then Referral Exclusion List. If you set your default URL, in the View, View Settings section, then your domain is already in here. Add any additional websites in this section.
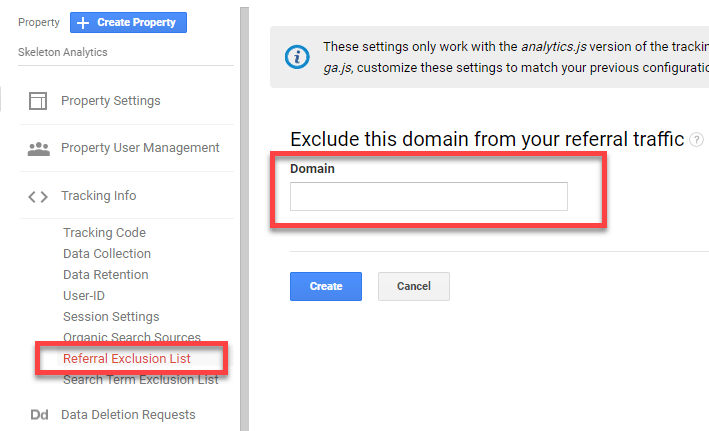
The big benefit of Referral Exclusion is that it ignores a website as a referrer and instead turns it into direct traffic. For example, if you send people to Paypal to process payments. You will want to exclude traffic from Paypal or else Google Analytics will count visitors who have successfully paid and returned to your site as new visitors.
Takeaway: Exclude any domain you own using the Referral Exclusion feature. Self-referrals can artificially inflate your page view counts making your google analytics data unreliable.
Enhanced Ecommerce
eCommerce brand looking to take it to the next level? Learn how we help DTC eCommerce companies…
If you sell DTC (direct to consumer) enabling enhanced ecommerce will give you access to additional Google Analytics reports that can give you insight into how people are purchasing your product.
To set up ecommerce tracking you must go into your Admin. Under View go into E-commerce Settings and switch the button on. While here, create a funnel if all your customers take the same path to checkout.
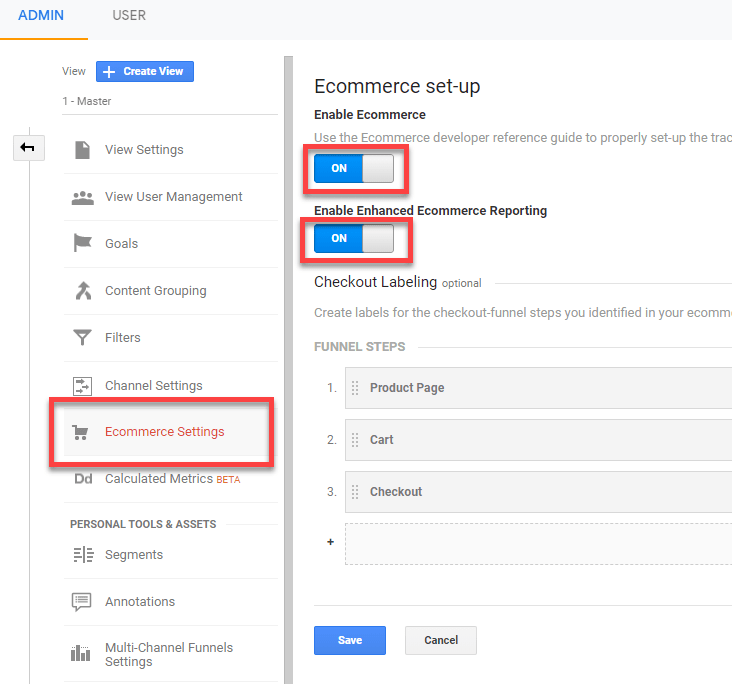
But that’s where the easy part ends.
The trick here is you also need to install dynamic javascript code into your analytics. The easiest way to do this is with Google Tag Manager and/or a developer.
Takeaway: If you are a serious e-commerce store, these new reports can help you see the efficiency of your store. Metrics on average order value, or comparing product categories against each other, puts your digital marketing efforts into context.
UTM Parameters
UTM parameters are crucial for attribution. Whether you are promoting your site through organic or paid (PPC) channels, through guest posts or social media, you need to separate your marketing activities. If you don’t, your paid and organic Facebook traffic will get lumped together.
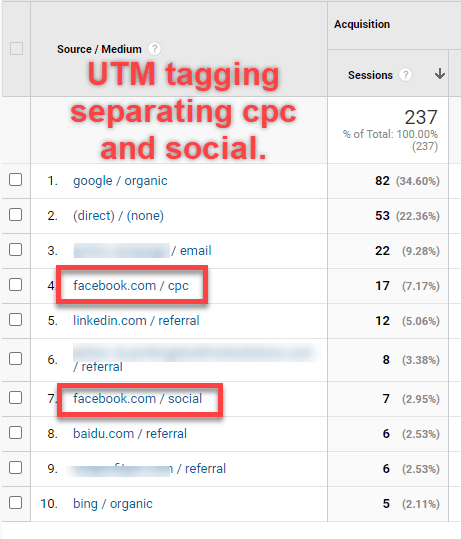
Not everything in marketing can be tracked, even in this digital age. Just use a URL builder and don’t overthink it. You can refine as you go. It’s more important that you track your social media and other channels where you can get organic as well as paid traffic. Your Google ads PPC campaigns should automatically be tagged.
Takeaway: Don’t overthink this one. Build a UTM parameter to track the effectiveness of your campaigns.
In Conclusion
That completes my top 15 fixes for your Google Analytics implementation. There’s a lot more you can do, some of these I barely scratched the surface.
Hopefully, you see why all the fixes I recommended are important. Their benefits range from clarifying data to improving business decisions to tying digital activities to business goals, to protecting your company from possible negative repercussions.


